Featured

Monday, December 30, 2019

Happy Valentine's Day!

Hello Everyone!
I made another really cute card today and
wanted to share it with you...

This is my second one for Valentine's Day already
and we just barely got finished with Christmas :)

Check out how adorable this card turned out...
(click pic to enlarge)

I made this card using pretty much all Lawn Fawn products except
for one of the dies from Sunny Studio Stamps that I'll list first.

Sunny Studio Stamps
Frilly Frames Lattice

Lawn Fawn
Quilted Backdrop
You're Just My Type stamp set
You're Just My Type lawn cuts
Ballet Slippers Cardstock

I really like the monochrome look with just
the little pop of light pink and the glow from
the light bulb in the lamp.

Isn't that little mouse the cutest?

I ABSOLUTELY LOVE this card!

Stay tuned... more Valentine cards to come.

If you don't want to miss any of my blog posts, be sure
to follow me by email either on my blog home page or
on my right sidebar so you'll be notified when I
make a new post :)

Thank you all for checking out my project today!
Hope you enjoyed it :)

Wednesday, December 25, 2019

XOXOXO

Hello Everyone!
I can't believe another year is coming to a close.  We're
not even finished with Christmas and New Year's Eve
and the stores are already putting out their goodies
for Valentine's Day!

I say...Bring it on!  LOL!
As much as I enjoy the Holidays, I'm always ready
to move on to the new year.

I am so excited to start on Valentine's projects so I
decided to make my first one today.

Check out how adorable this card turned out...
(click pic to enlarge)

I made this card using pretty much all Lawn Fawn products.

Polka Heart background die
Candy Hearts dies
XOXOXO Line Border
Stitched Scalloped Rectangle Frames
Outside In Stitched Rectangle Stackables
Outside In Stitched Scalloped Rectangle Stackables
Sunflower Cardstock
Ballet Slippers Cardstock
Mermaid Cardstock

Background is blended with Distress Oxide colors...
Spun Sugar
Squeezed Lemonade
Cracked Pistachio

I ABSOLUTELY LOVE this card!

Stay tuned for more Valentine cards to come.

If you don't want to miss any of my blog posts, be sure
to follow me by email either on my blog home page or
on my right sidebar so you'll be notified when I
make a new post :)

Thank you all for checking out my project today!
Hope you enjoyed it :)

Sunday, November 24, 2019

Thanksgiving Place Card Holders

I wanted to show you these really cute and easy
Place Card Holders I made this year.  I saw several
versions of them on Pinterest and thought
I would make my own.

We usually don't have a huge Thanksgiving but I still
like to make the full dinner and dress up the table
a bit.

(click pic to enlarge)


I used a cute little Petal Box that I got
from the Silhouette store.  There were several to choose from.  I
used just the box portion from the Lori Whitlock
Santa Petal Box Design ID 70571

Then I used a portion of the Turkey Place Card file
from Dreaming Tree.  (It's FREE right now!)  I took
the front red piece and sliced it in half then enlarged
it for the back 3 feathers so they would
all match the same shape.

I added some googly eyes and made the tags
from another Lori Whitlock Silhouette file Design ID #18635
called 2 Label Shapes.  I used the bottom one and removed
the holes from the inside edge.  I did a print and
cut for our names for the tags.

I LOVE these Place Card Holders.  You can put after dinner mints or
some yummy chocolates in them for your guest.

Thank you all for checking out my project today!
Hope you enjoyed it :)

Thursday, November 7, 2019

Thankful

I completely forgot to share this pretty card I made 
using my "Stitched Pumpkin Frame"  die from Lawn Fawn 

(click pic to enlarge)


I used the "Fall Sentiment Stackers" from Queen & Company 
for the "Thankful" sentiment.  I also blended the background colors 
with my Distress Oxide Inks.

I LOVE this Pumpkin card!

Thank you all for checking out my card today!
Hope you enjoyed it :)

Wednesday, October 16, 2019

From Our Patch to Yours

Check out this cute Pumpkin card
I made today using my "Outside in Stitched Pumpkin"
die from Lawn Fawn 

(click pic to enlarge)


I used the "Spooky Village" stamp set for the sentiment.
The bats were cut from the "Scalloped Treat Box - 
Halloween Add On" die and the fence is from
"Spooky Fence Border" die.
I blended the background colors with my
Distress Oxide Inks.

I LOVE this Pumpkin card!

Thank you all for checking out my card today!
Hope you enjoyed it :)

Tuesday, October 15, 2019

Happy Fall

I wanted to share this cute Fall card
I made today using my "Outside in Stitched Pumpkin Frame"
die from Lawn Fawn 

(click pic to enlarge)


I used the "Happy Fall Line Border"for the sentiment

Isn't this a GREAT Christmas card?

Thank you all for checking out my card today!
Hope you enjoyed it :)

Sunday, October 13, 2019

Merry Christmas

I wanted to share this cute Christmas card
I made today using my "Build a House" die
from Lawn Fawn and the "Christmas" Add On

(click pic to enlarge)

I used the "Tiny Christmas", "Winter Skies"
and "Snow Bunnies" Lawn Fawn stamp
sets for the dog, Merry Christmas sentiment and
Santa and Reindeer.  The tree is
from the "Scalloped Treat Box Winter House Add On".
I used the large one and cut off the bottom to fit right.

Isn't this a GREAT Christmas card?

I see a few more of these on my crafty schedule :)

Thank you all for checking out my card today!
Hope you enjoyed it :)

Wednesday, September 4, 2019

Action Wobble
September 2019 Challenge

Hi Everyone!

Today kicks off the monthly 
Action Wobble Challenge! 

Here's where you get to join our team and
share your Action Wobble Creations.

This month's challenge theme is
Back to School

Here is the cute little card I made for inspiration...

(click pic to enlarge)
Still shot

Wobble in action!

Isn't this soooo cute?

I made my card using the following...

A cute bus file from Lettering Delights in
the Silhouette store design ID: 215935.
The sentiment is from the Lawn Fawn
"Tree Before 'n Afters" stamp set.
The background is from a cute file by Sophie
Gallo in the Silhouette store design ID: 297850.
The cute little trees and cloud in the background are
from the Lawn Fawn "Spooky Village" stamp set.

Monday, September 2, 2019

Cute "Thank You" card

I recently had dental surgery and made this 
adorable "Thank You" card for my Dental Surgeon 
and his amazing office staff.

I completely forgot to share it with everyone so 
here it is :)

(click pic to enlarge)


The tooth is from an Echo Park file in
the Silhouette store design ID: 205336.
The "Thank You" is from a Silhouette file by
Samantha Walker design ID: 8978.  I added 
the line under it. 
I also decorated the envelope with a cute stamp
You can get it exclusively from HSN.

I put the tooth on an Action Wobble to add a 
little fun to it :)

Isn't this a GREAT Thank You card?

Thank you all for checking out my card today!
Hope you enjoyed it :)

Wednesday, August 7, 2019

Action Wobble
August 2019 Challenge

Hi Everyone!

Today kicks off the monthly 
Action Wobble Challenge! 

Here's where you get to join our team and
share your Action Wobble Creations.

This month's challenge theme is
Fruits or Vegetables

Here is the cute little card I made for inspiration...

(click pic to enlarge)
Still shot

Wobble in action!

Isn't this soooo cute?

I made my card using the following...

A cute Strawberry file from
Creative Cuttable Designs in
the Silhouette store design ID: 41508
The sentiment is from Echo Park in the
Silhouette store design ID: 127892
The background die is from Papertrey Ink. 
It's the Mix & Mat: Confetti Die.
The Yellow Polka Dot paper is from
the Pink & Main "Sunrise" paper pack

Wednesday, July 3, 2019

Action Wobble
July 2019 Challenge

Hi Everyone!

Today kicks off the monthly 
Action Wobble Challenge! 

Here's where you get to join our team and
share your Action Wobble Creations.

This month's challenge theme is
Christmas in July

Here is the cute little card I made for inspiration...

(click pic to enlarge)
Still shot

Wobble in action!

Isn't this soooo cute?

I made my card using the following...

A cute Christmas Stocking file from
Printable Cuttable Creatables
called Christmas Monogram Frames.
The sentiment is from an older stamp set 
but unfortunately, I don't have 
the name of the company on it.
The background die is from Papertrey Ink. 
It's the Scallop Stackers: Large Die.

Sunday, June 16, 2019

Life is Sweet

I thought I would share this cute
Pineapple card I made today!

I bought this die at a scrapbook convention this
past week and couldn't wait to use it

Hope you like it!

(click to enlarge pic.)


This Pineapple die is from The Stamps of Life.
It's a Pineapple fold it card not available on their website
until June 20th.  I was lucky enough to find it available at
 the convention I went to.  I couldn't pass it up.  
The sentiment is is something I just typed up in 
Silhouette and did a print and cut on.  

All of the solid cardstock is from Papertrey Ink and
the green polka dot is from Doodlebug Design.

Hope you enjoyed my card today!

If you don't want to miss any of my blog posts, be sure
to follow me by email either on my home page or
on my right sidebar so you'll be notified when I
make a new post :)

Thursday, June 13, 2019

Hogs & Kisses

I couldn't wait to share this really
cute card I made today...

I bought this die and stamp set this
past week and decided to make another
shaker card.

Hope you like it!

(click to enlarge pic.)


This piggy die is from The Stamps of Life.
It's called "Piggy Bank Die Set" and the sentiment
is from the "Piggybank2stamp" set.  I stamped it with 
The Stamps of Life Premium Dye ink pad in Licorice 
from one of their mini sets.
The die set comes with a shadow die so I just
cut the main die and the shadow die together and
used the outline portion that cuts between
the two of them.  
In order to make my shaker pocket, I cut out 11 of the 
Piggy outlines and layered them on top of each other with 
glue to create the depth needed for the size 
of sequins I was using.

You can check out this video I googled from YouTube HERE to get a
better idea of the layering effect.  She starts to layer at about min 3:30
on the video if you want to skip ahead.  It's a good video so you might
decide to watch the whole thing.

The cute frame I used is a die from Paper Trey Ink called

That's it!
Hope you enjoyed my card today!

If you don't want to miss any of my blog posts, be sure
to follow me by email either on my home page or
on my right sidebar so you'll be notified when I
make a new post :)

Wednesday, June 5, 2019

Action Wobble
June 2019 Challenge

Hi Everyone!

Today kicks off the monthly 
Action Wobble Challenge! 

Here's where you get to join our team and
share your Action Wobble Creations.

This month's challenge theme is
Zoo Animals

Here is the cute little card I made for inspiration...

(click pic to enlarge)
Still shot

Wobble in action!

Isn't this soooo cute?

I made my card using the following...

A cute Llama file from Doodlebug Designs
Silhouette Store Design ID 278546
and the sentiment is something I 
wrote in Silhouette and did a print and cut on.
The background dies are a combination of the
Frilly Frames Lattice from Sunny Studio and the
Lawn Fawn Quilted Backdrop

Tuesday, May 28, 2019

Blog Hop WINNERS!


Announcing our Blog Hop Girls Hop winners!

Thank you so much for hopping along with us on our first HOP!

Without further ado...the WINNERS are…

Rhonda Miller Marycardz TV Stamp Set
Congratulations!  Please send your address to joolie2006@yahoo.com

McStamper – Bakers Dozen (13) Action Wobbles
Congratulations!  Please send your address to joolie2006@yahoo.com

Hope you all had fun and will join us for our next HOP!


Sunday, May 26, 2019

Blog Hop Girls
Hop #!

Hi Everyone!
Welcome to the First Blog Hop Girls hop!

Woo-Hoo!!

If you are starting at my blog, that's great...just follow 
the list below of the other blogs in the Hop.

Let's get started!

This hop theme is anything goes so, 
for my project, I created an adorable Flamingo card.
(Click on pic to enlarge)
I don't know about you but I LOVE Flamingos!

Lots of comments on the background die.  Thought I
would share the link in case anyone wants it :)  It's the
Frilly Frames Polka-Dot die from Sunny Studio.

Now...on to the goodies...

PRIZES!
All you need to do is comment and follow all of the blogs
on the blog hop list for a chance to win.
If you are having trouble finding where to comment on my 
blog, go to the title of this post and click on it.  Then you should
be able to scroll down and find the comments :)

We will EACH select a winner for a
 set of Cardz TV Stamps 
AND 
another winner for 
a Baker's Dozen set of Action Wobbles!!

(Prizes are shipped to USA addresses only)
Some of our blogs may have 
special extra chances to win listed in their post.
(psssst...mine does....)

For extra chances to win,.. Head over to my
my Instagram page and follow me THERE
Once you have followed me, leave a 
second comment on this post letting me know you did.

Here are all of the links in this hop.

Julie (you are here)

Winners will be posted on our blogs 
Tues, May 28th, 2019

Thanks for hopping along with us today!

Friday, May 24, 2019

Action Wobbles
Free Hugs

Hi Everyone! 

I'm up on the Action Wobbles Blog today
for my Design Team post.

I'm so excited to show you my cute little 
card I made.

Here you go...
(Click on the pic to enlarge)

Saturday, May 18, 2019

Sunshine Kisses
&
Rainbow Wishes

I wanted to share another really cute 
card I made today.

This time, I made a shaker card with an
adorable stitched cloud die I have.

Hope you like it!

(click to enlarge pic.)


I used the Stitched Rainbow die from Papertrey Ink
and a Cloud die from an unknown source.
The background is the Fancy Scalloped Rectangle Stackables
die from Lawn Fawn.
The sun is from the Beach Palm Tree and Sun file by
Lori Whitlock in the Silhouette Store (Design ID 28210).

I couldn't find the right stamp to use for 
my sentiment so I typed this one up  
and did a print and cut on my Silhouette.

In order to create my shaker, 
I cut out 8 of the clouds with the cloud die and layered them
on top of each other with glue to create the depth needed
for the size of beads I was using.

You can check out this video I googled from YouTube HERE to get a
better idea of the layering effect.  She starts to layer at about min 3:30
on the video if you want to skip ahead.  It's a good video so you might
decide to watch the whole thing.

I ended up scanning and tracing the shape of the cloud to my 
Silhouette in order to cut the layer of acetate for
the face of the shaker.

I used Fun Foam for the top layer of my 
Cloud shaker and filled it with fishbowl beads.
I love how it turned out.


Hope you enjoyed my card today!

If you don't want to miss any of my blog posts, be sure
to follow me by email either on my home page or
on my right sidebar so you'll be notified when I
make a new post :)

Saturday, May 11, 2019

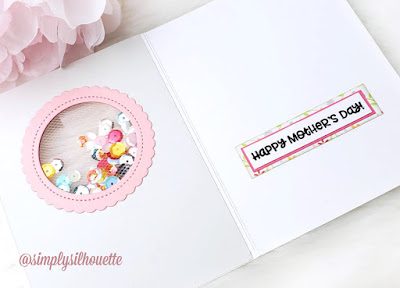
Happy Mother's Day

I wanted to share the lovely
Mother's Day card I made for
my MOM this year.

Not to worry...she has already received it
and LOVES it so no spoiler alert...LOL!

I watched a video by Jennifer McGuire on 
shaker cards using tulle instead of acetate
to hold the sequins in place.

I couldn't wait to try it out...It gave the card 
such a nice soft look.

Here you go...
(click on pic to enlarge)
Front

View of tulle window

Inside

For the base of my card and back panel, I used cardstock
from Papertrey Ink soon to be Ink to Paper.

I created the circle shaker window by
from Queen & Co and filling it with
sequins from Lawn Fawn. Unfortunately,
I don't know the name of the mixed color. 

The cute floral patterned paper is from the
Flirty Florals 6 X 6 paper pad that comes in 
You can also buy it separately HERE.

The "Mom" on the front is from the

Then I finished it off with the Sentiment from
from Queen & Co.

This card exceeded my expectations.  I'm so
happy it turned out the way it did and I was
able to get it off to my Mom in time for 
Mother's Day.

Hope you all enjoyed this as much as we did. 

Wishing you all a Happy Mother's Day!