Featured

Wednesday, September 11, 2013

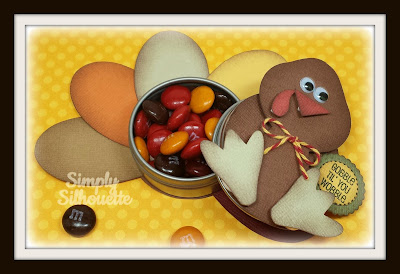
Turkey Candy Tins

Hi Everyone!

I found another really cute project that
I've been so excited to make...I just love it
and you will too!

Here it is...
(click on the pic to enlarge)
Front

Side

Open

This was soooooo easy to put together.  If you want
a lot of party favors fast, this is the project
for you...

I found the template for the turkey HERE!
While you are over there I urge you to take
a look around.  It's a really cool blog with
lots of projects...

I started with a candy tin from Joy's Life HERE 
under Craft Containers... Then
I used my Jaded Blossom Thanksgiving
& Banners Die then finished off Tom Turkey
with a little bow of Trendy Twine "Cherry Lemonade"

Well, I hope you liked my Turkey Candy Tin
I have a feeling I'll be making several of these
this year :)

HAVE A GREAT DAY!

Sunday, September 8, 2013

Best Witches

Hi Everyone!

While doing some Pinterest surfing today,
I ran across this really cute project.  They
used a toilet paper roll for the tube to I thought...
why not use a candy tube...?

So, I did...and here it is...
(click on the pic to enlarge)
Front

Side

Side

To see my inspiration, click HERE

I put all the pieces of this project into Make The Cut
so I didn't have to cut them by hand.
I used the 1X6 inch Clear Tubes and the 
Candy Charms Banner Dies from Jaded Blossom.
I stamped the Banner Die with "Best Witches" from
the Best Witches stamp set also from Jaded Blossom.

I tied the Banner Die on with some black tulle 
and finished it off with my Trendy Twine 

I know anyone would just love to get this cute
little Witch's Boot for Halloween so......

I am going to give the file for the boot
to you for free... You'll have to get your
own tubes, twine, tulle and candy :)

As most of you know already, I just
require you to become a follower of my blog,
leave a comment on this post, and email me
at Simplysilhouette@yahoo.com and ask me
for the file.  Remember I will only reply to the
email with the file so make sure you are emailing
me from the address you want it sent to...

Hopefully you all liked my little project today!

Have a GREAT Day!

Saturday, September 7, 2013

"Say It In English"
Home Sweet Home
Blog Hop!

Hi Everyone!
Welcome to the "Say It In English"
Blog Hop...

I feel very lucky to be included in this special
hop to introduce a new set of stamps
from "Dilo En Español" Say It In Spanish...

Even though Abby's main focus is Spanish stamps,
she was encouraged by someone who loved the
images so she decided to start a small line
of stamps called 
Say It In English "Home Sweet Home"

She is planning on releasing a new set
every couple of months so you'll want to
get them while they are hot!

Here is what I made...
(click on the pic to enlarge)
Side
It's a mail truck with a little
Housewarming Party invitation inside...

Back

Front

Invitation

Close Up

I remember when I bought my first house in
Los Angeles and had a Housewarming party...
Ohhhh how I wish I would have had a 
Silhouette to cut this mail truck and
this Amazing set of stamps to go with it..
My invitations were so boring compared to this one !

Who wouldn't want to go to a party where the 
invites are 3D...??

I used one of the cute house images and 
the sentiment that says
"Our New Address"
There are so many cute things you can create with this set!


The illustrator of these adorable images
She is from Guadalajara, Mexico and
also has her own line of paper...

If you would like the template for
the Mail Truck click HERE...

Invitation was finished off with

BLOG CANDY ALERT!
One lucky person will receive the
stamp set "Home Sweet Home"
and 20 yards of the new solid colors
from the The Twinery brand.

Just leave a comment on each blog post
on the hop and you'll be entered!

I hope you enjoyed my project...
Your next stop is the very talented

Here is the line up in case you get lost...
DIlo En Español: www.retosabby.com
Cricut Chick: www.cricutchick.com

Check out the "Dilo En Español" "Say It In Spanish"
Pinterest boards HERE for lots of 
inspiration!

Have a GREAT day!

Sunday, September 1, 2013

Take 2

Hi everyone...
Today I have a really cool project
that I've been working on.

I won the new G45 Steampunk Spells collection
from SVG Cuts and couldn't wait to dig in...

When I saw this project, I thought it would be the
perfect paper for it!

Here it is...
(Click on the picture to enlarge)
Front

Side

Back

This was a WPC Cutting file that I got from HERE
The newer version of Make The Cut allows you to import
WPC files directly from your toolbar.
If you can't download a WPC file, she also has
it in a template form if you scroll down further on her post.

The main box opens at the top so you can use it for
storage or to hold a special gift for someone.  The little box
on the back also opens up for smaller objects.

The box on the bottom is left open on the front and
holds a cute little mini album.

If you want the G45 Paper collection, you can get it 
and much more over at The Royal Castle Shoppe
it's my source for paper and supplies...

I cut all of the boxes with black cardstock then reinforced
them with medium weight chipboard then 
covered them with G45 paper.

I hope you liked my project today!

Would love for you to leave me a comment...
I really enjoy reading them :)

Have a GREAT day!